


 How Now Brown Cow?
Here I am showing more close up details of this work in progress.
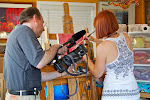
- PHOTO ONE: details my use of Starbucks bags to create the pasture grasses, I love how when you rip this paper, the rough edge is brown, from the paper bag. That brown edge is so much more interesting combined with the green, I make extra tears just to show it off! Notice how the cow in the pasture is simple without much detail, I use only solid white and no type for her spots, I want to keep her in the background with simplicity.
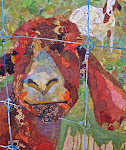
- PHOTO TWO: highlights the eye. Since every face I do is some version of a self portrait, I have given my cow blue eyes! I use many tiny bits of paper for a more expressive and realistic feeling here, I never make the iris from just one color or just one piece of paper, the movement of many little pieces gives more life.
- PHOTO THREE: highlights the little illustrations I found in the French text book, especially the one of the horse which I incorporated just below the cow's chin. The French textbook pages are off white, almost yellow and I use them for white areas which would be in the shadow, rather than the highlight.
- PHOTO FOUR: details the wonderful texture of the handmade paper I used for the nose, paper made by local artist and friend, Judy Segal. I tried to save some text that says "in his father's barn" for the bridge of the nose as a treat for anyone looking very closely!


Thanks for sharing the details. Love it! I cannot wait to get my cupcake so I can see them in person. I am hoping it is at work when I arrive on Monday. :)
ReplyDeleteThank you for the details - I am going to try a paper painting today, I figure I better get something done before I go to your workshop in Feb! Anyway, I really enjoy your blog and love to see the things you're working on. Thanks.
ReplyDeletei so appreciate how you've shown us details of your work in progress! as always, you've inspired me!
ReplyDeletewhen you have a moment, please stop by my blog and see my new header photo, a self-portrait i'm working on this week!!
Yay...thanks for all those detail shots.
ReplyDeleteIt makes seeing what you describe sooo much easier.
The textures are wonderful.
I'm already looking forward to more!!
WW thanks for the great suggestions and constructive feedback, you have inspired me.
ReplyDeleteRisktaker, I look forward to meeting you in the February workshop. If you have time to try your hand at a Paper Painting, you'll have more questions and material to address in the workshop!
ReplyDeleteHi Elizabeth...
ReplyDeletethis is amazing...the details are so perfect...you blow me away with these wonderful pieces....I love all of your work...the torn paper details are an inspiration....I feel like making something ...
Hope you have a wonderful Holiday and I can only imagine all the great things you will be creating in 2009!!!
Hugs
Diana
Diana, if I can inspire you to want to make something that is wonderful! I spent a few hours at the Orlando Museum of Art today, that always makes me want to make something. I was thinking about unfinished edges when I left there and how I could incorporate that into my own work, not go all the way to the frame edge but rather leave a rough edge... I might try that next. I love being inspired. I am happy to inspire!
ReplyDelete